Cotaka
Admin


Messages : 94
Date d'inscription : 10/03/2013
Age : 32
Localisation : Aquitaine
 |  Sujet: Sublimer GW2 grâce à SweetFx Sujet: Sublimer GW2 grâce à SweetFx  Ven 24 Mai - 20:06 Ven 24 Mai - 20:06 | |
| SweetFx - Citation :
- Késako ? le SweetFX est un mod construit sur le shader InjectSMAA et permet d'avoir une amélioration post-processing en appliquant des shaders, il s'applique sur énormément de jeux compatible DirectX 9/10/11 (il faut un GPU qui supporte au minimum DirectX 9 et le Shader Model 3.0) et fonctionne sous Windows (2000 à 8 / version 32 et 64 bit), il est développé par CeeJay.dk de chez Guru3D.
Le SweetFX améliore et remplace tout les injecteurs qu'on pouvait utiliser avant comme les InjectFXAA, InjectSMAA ou FXAAtool, il est destiné à vous permettre d'améliorer l'apparence de vos jeux et de changer le look et l'ambiance à votre goût. Liens :
- Topic officiel
- Tuto en français
- Téléchargement de SweetFx
SCREENS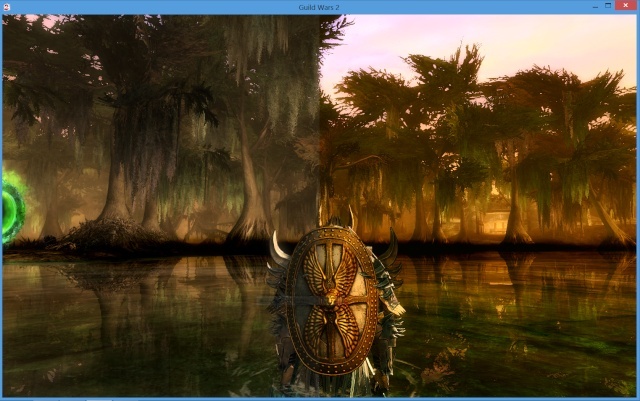 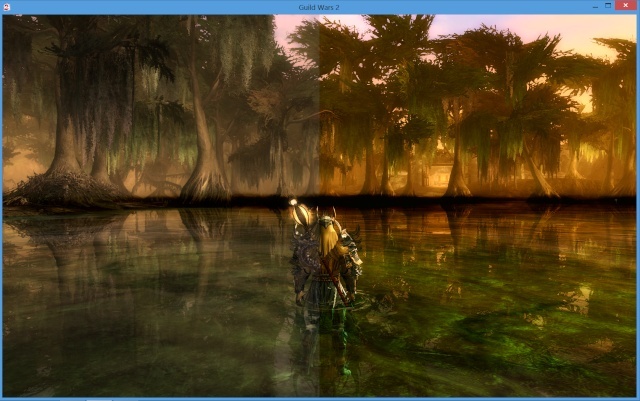 Pour voir le résultat en live CLIQUEZ-ICI Pour voir le résultat en live CLIQUEZ-ICI
Avec SweetFx, vous pouvez :
- Augmenter le contraste
- Saturer les couleurs
- Ajouter du détail
- Passer l'image en monochrome
- Mettre l'image en mode "cartoon"
- etc etc...
-- Comment installer --1) Téléchargement et décompressionTélécharger le fichier " SweetFX 1.4.7z" sur le lien plus haut. Décompresser le contenu dans un dossier sur votre bureau (par exemple). 2) Installation
- Quittez GW 2.
- Aller dans votre dossier "Guild Wars 2" qui se situe soit dans : C:\Program Files (x86) ou C:\Programmes.
Copier tout le contenu du fichier SweetFX 1.4.7z que vous avez téléchargé puis extrait sur votre bureau, directement dans le dossier de Guild Wars 2.
- Déplacer le dossier "Guild Wars 2" à la racine de votre disque C:. En gros le dossier de Guild Wars 2 n'est plus dans C:\Program Files (x86) ou C:\Programmes mais directement dans C:\
- Faite un clique droit sur le dossier "Guild Wars 2" > Propriétés > En bas de la fenêtre dans "Attributs" décocher la case "Lecture seule (s'applique uniquement aux fichiers du dossier)" > Cliquez sur "OK"

-- Configuration --
- Rendez-vous dans le dossier de Guild Wars 2. Ouvrez le fichier "SweetFX_settings.txt", sélectionnez-tout le texte et supprimez.
- Copiez le texte ci-dessous :
- Code:
-
/*-----------------------------------------------------------.
/ Choose effects /
'-----------------------------------------------------------*/
// Set to 1 for ON or 0 for OFF
#define USE_SMAA_ANTIALIASING 1 // [0 or 1] SMAA Anti-aliasing : Smoothens jagged lines.
#define USE_LUMASHARPEN 1 // [0 or 1] LumaSharpen : Also sharpens the antialiased edges which makes them less smooth - I'm working on fixing that.
#define USE_BLOOM 0 // [0 or 1] Bloom : Makes bright lights bleed their light into their surroundings (relatively high performance cost)
#define USE_HDR 0 // [0 or 1] HDR : Not actual HDR - It just tries to mimic an HDR look (relatively high performance cost)
#define USE_TECHNICOLOR 0 // [0 or 1] TECHNICOLOR : Attempts to mimic the look of an old movie using the Technicolor three-strip color process (Techicolor Process 4)
#define USE_DPX 0 // [0 or 1] Cineon DPX : Should make the image look like it's been converted to DXP Cineon - basically it's another movie-like look similar to technicolor.
#define USE_LIFTGAMMAGAIN 1 // [0 or 1] Lift Gamma Gain : Adjust brightness and color of shadows, midtones and highlights (avoids clipping)
#define USE_TONEMAP 1 // [0 or 1] Tonemap : Adjust gamma, exposure, saturation, bleach and defog. (may cause clipping)
#define USE_VIBRANCE 1 // [0 or 1] Vibrance : Intelligently saturates (or desaturates if you use negative values) the pixels depending on their original saturation.
#define USE_CURVES 1 // [0 or 1] Curves : Contrast adjustments using S-curves.
#define USE_SEPIA 0 // [0 or 1] Sepia : Sepia tones the image.
#define USE_VIGNETTE 0 // [0 or 1] Vignette : Darkens the edges of the image to make it look more like it was shot with a camera lens. May cause banding artifacts.
#define USE_DITHER 0 // [0 or 1] Dither : Applies dithering to simulate more colors than your monitor can display. This lessens banding artifacts (mostly caused by Vignette)
#define USE_SPLITSCREEN 0 // [0 or 1] Splitscreen : Enables the before-and-after splitscreen comparison mode.
/*-----------------------------------------------------------.
/ SMAA Anti-aliasing settings /
'-----------------------------------------------------------*/
#define SMAA_THRESHOLD 0.12 // [0.05 to 0.20] Edge detection threshold
#define SMAA_MAX_SEARCH_STEPS 90 // [0 to 98] Determines the radius SMAA will search for aliased edges
#define SMAA_MAX_SEARCH_STEPS_DIAG 16 // [0 to 16] Determines the radius SMAA will search for diagonal aliased edges
#define SMAA_CORNER_ROUNDING 40 // [0 to 100] Determines the percent of antialiasing to apply to corners.
// -- Advanced SMAA settings --
#define COLOR_EDGE_DETECTION 1 // [0 or 1] 1 Enables color edge detection (slower but slightly more acurate) - 0 uses luma edge detection (faster)
#define SMAA_DIRECTX9_LINEAR_BLEND 0 // [0 or 1] Using DX9 HARDWARE? (software version doesn't matter) if so this needs to be 1 - If not, leave it at 0.
/*-----------------------------------------------------------.
/ LumaSharpen settings /
'-----------------------------------------------------------*/
// -- Sharpening --
#define sharp_strength 1.50 // [0.10 to 3.00] Strength of the sharpening
#define sharp_clamp 0.045 // [0.000 to 1.000] Limits maximum amount of sharpening a pixel recieves - Default is 0.035
// -- Advanced sharpening settings --
#define pattern 3 // [1|2|3|4] Choose a sample pattern. 1 = Fast, 2 = Normal, 3 = Wider, 4 = Pyramid shaped.
#define offset_bias 1.0 // [0.0 to 6.0] Offset bias adjusts the radius of the sampling pattern.
// I designed the pattern for offset_bias 1.0, but feel free to experiment.
// -- Debug sharpening settings --
#define show_sharpen 0 // [0 or 1] Visualize the strength of the sharpen (multiplied by 4 to see it better)
/*-----------------------------------------------------------.
/ HDR settings /
'-----------------------------------------------------------*/
#define HDRPower 1.10 // [0.0 to 8.0] Strangely lowering this makes the image brighter
#define radius2 0.825 // [0.0 to 8.0] Raising this seems to make the effect stronger and also brighter
/*-----------------------------------------------------------.
/ Tonemap settings /
'-----------------------------------------------------------*/
#define Gamma 1.0 // [0.00 to 2.00] Adjust midtones
#define Exposure 0.20 // [-1.00 to 1.00] Adjust exposure
#define Saturation 0.20 // [-1.00 to 1.00] Adjust saturation
#define Bleach 0.00 // [0.00 to 1.00] Brightens the shadows and fades the colors
#define Defog 0.008 // [0.00 to 1.00] How much of the color tint to remove
#define FogColor float3(0.00, 2.55, 2.30) // [0.00 to 1.00, 0.00 to 1.00, 0.00 to 1.00] What color to remove - default is blue
/*-----------------------------------------------------------.
/ Vibrance settings /
'-----------------------------------------------------------*/
#define Vibrance 0.40 // [-1.0 to 1.0] Intelligently saturates (or desaturates if you use negative values) the pixels depending on their original saturation.
/*-----------------------------------------------------------.
/ Bloom settings /
'-----------------------------------------------------------*/
#define BloomThreshold 20.25 // [0.00 to 50.00] Threshold for what is a bright light (that causes bloom) and what isn't.
#define BloomPower 1.446 // [0.0000 to 8.0000] Strength of the bloom
#define BloomWidth 0.0142 // [0.0000 to 1.0000] Width of the bloom
/*-----------------------------------------------------------.
/ TECHNICOLOR settings /
'-----------------------------------------------------------*/
#define TechniAmount 0.11 // [0.0 to 1.0]
#define TechniPower 2.8 // [0.0 to 8.0]
#define redNegativeAmount 0.88 // [0.0 to 1.0]
#define greenNegativeAmount 0.88 // [0.0 to 1.0]
#define blueNegativeAmount 0.88 // [0.0 to 1.0]
/*-----------------------------------------------------------.
/ Cineon DPX settings /
'-----------------------------------------------------------*/
#define Red 8.0 // [1.0 to 15.0]
#define Green 8.0 // [1.0 to 15.0]
#define Blue 8.0 // [1.0 to 15.0]
#define ColorGamma 2.5 // [0.1 to 2.5] Adjusts the colorfulness of the effect in a manner similar to Vibrance. 1.0 is neutral.
#define DPXSaturation 3.0 // [0.0 to 8.0] Adjust saturation of the effect. 1.0 is neutral.
#define RedC 0.36 // [0.6 to 0.2]
#define GreenC 0.36 // [0.6 to 0.2]
#define BlueC 0.34 // [0.6 to 0.2]
#define Blend 0.2 // [0.0 to 0.1] How strong the effect should be.
/*-----------------------------------------------------------.
/ Lift Gamma Gain settings /
'-----------------------------------------------------------*/
#define RGB_Lift float3(1.016, 1.014, 0.97) // [0.000 to 2.000] Adjust shadows for Red, Green and Blue
#define RGB_Gamma float3(1.000, 1.000, 1.000) // [0.000 to 2.000] Adjust midtones for Red, Green and Blue
#define RGB_Gain float3(1.000, 1.000, 1.000) // [0.000 to 2.000] Adjust highlights for Red, Green and Blue
/*-----------------------------------------------------------.
/ Curves settings /
'-----------------------------------------------------------*/
#define Curves_contrast 0.20 // [-1.0 to 1.0] The amount of contrast you want
// -- Advanced curve settings --
#define Curves_formula 4 // [1|2|3|4|5|6|7] The constrast s-curve you want to use.
/*-----------------------------------------------------------.
/ Sepia settings /
'-----------------------------------------------------------*/
#define ColorTone float3(1.40, 1.10, 0.90) // [0.00 to 1.00, 0.00 to 1.00, 0.00 to 1.00] What color to tint the image
#define GreyPower 0.11 // [0.0 to 1.0] How much desaturate the image before tinting it
#define SepiaPower 0.58 // [0.0 to 1.0] How much to tint the image
/*-----------------------------------------------------------.
/ Vignette settings /
'-----------------------------------------------------------*/
#define VignetteRadius 1.00 // [-1.00 to 3.00] lower values = stronger radial effect from center
#define VignetteAmount -1.00 // [-2.00 to 1.00] Strength of black. -2.00 = Max Black, 1.00 = Max White.
#define VignetteSlope 8 // [1 to 16] How far away from the center the change should start to really grow strong (odd numbers cause a larger fps drop than even numbers)
#define VignetteCenter float2(0.500, 0.500) // [0.00 to 1.00] Center of effect.
/*-----------------------------------------------------------.
/ Dither settings /
'-----------------------------------------------------------*/
//No settings yet, beyond switching it on or off in the top section.
//Note that the checkerboard pattern used by Dither, makes an image harder to compress.
//This can make your screenshots and video recordings take up more space.
/*-----------------------------------------------------------.
/ Splitscreen settings /
'-----------------------------------------------------------*/
#define splitscreen_mode 1 // [1|2|3|4|5] 1 = Vertical 50/50 split, 2 = Vertical 25/50/25 split, 3 = Vertical 50/50 angled split, 4 = Horizontal 50/50 split, 5 = Horizontal 25/50/25 split
Collez-le texte dans le fichier "SweetFX_settings.txt" puis enregistrez !
Lancez GW2 et ENJOY  -- Télécharger des pré-réglages -- -- Télécharger des pré-réglages --Voici 3 sites sur lesquels vous devriez trouver votre bonheur  :
- sfx.thelazy.net
- GameTweaks.net
- GsnGaming.com
P-S : Le texte que je vous ai fais copié sont mes réglages perso, je le peaufinerai la semaine pro une fois sur mon PC  . .
Bien-entendu, libre à vous d'aller sur le web, et en particulié sur les liens que je vous ai filé pour chercher des réglages différents  . . | |
|
![Guilde Eagles Eyes [SKY]](https://2img.net/r/hpimg15/pics/899495previewban.png)


